Showing posts with label blogger guaid. Show all posts

Sunday 28 December 2014

How To make money with adfouc.us

Description :Here's a method im using right now on Adfocus. Remember guys, don't abuse this method as they are likely to ban you if you make crazy amounts like 1200$ in 2 hours. Just do it like me 30$ max per day (or more if you wish to, but i still didn't get banned :) ) !What you need : - a brain :troll:- a PC (dugh...)- an internet connection- Mozilla Firefox !Method :Step 1: Register at http://www.adfoc.usStep 2: Get on Firefox, and download this add-on: https://addons.mozilla.org/en-us/firefox/addon/ipflood/Step 3: Also download this add-on: https://addons.mozilla.org/en-us/firefox/addon/reloadevery/ Step 4: Make a link with adfoc.us, and open it in about 20 tabs or so.Step 5: Right click on all the tabs and hover of ReloadEvery, than click every 10 seconds (best results with 10) than click enableStep 6 (optional): Use a window hider to hide Firefox, you can just keep it going all day, and get about $30 a day

Saturday 27 December 2014

How to Make a blogger Backup

Blogger is a free service by which you can make your own free blog. Your site is hosted by Google servers therefore if your site doesn’t comply with their Terms and services they delete your blog/site without giving a second chance. And sometimes your blog/site will deleted mistakenly. There is no perfect solution to get back your deleted blog / site. The only solution is you make a backup of all of your blog posts and including all images. In my this post i will show you how to make a backup of your blog. You must have make a backup of your blog after three or four days because unfortunately your blog was deleted mistakenly so that you have a backup of your blog and you can use this backup on Wordpress by purchase you own web hosting


How Make a Backup Of Your Blog?

To backup only your blogger template that you are just downloading only your blog template and its widgets because sometimes we make some changes in blogger template if these changes were not apply then we upload our previous template which we already downloaded follow these simple steps to make a backup of your blogger template.

Go to Blogger > Template
Now click on Backup/Restore option on top right side
Click on Download full template as following


it takes a few moments to download your blogger template but the main thing is download a copy of your all blog posts and every thing of your blog for this, Follow these steps
Go to Blogger > Settings > Other
In Blog Tools option click on Export Blog option as following

Now it take few minutes to download your blog if you have a large number of posts then it will take some long time to download a complete copy of your blog. This is actually the complete copy of your Blogger blog you should download your blog after three or four days because Blogger can disable your blog for violation or delete i mistakenly so having a copy of blog is a better solution to avoid from them

10 Tips to Increase Conversions!

  • First: Split testing. I want to give you a different approach here, because before you start creating a variation for the page you want to improve, you have to thoroughly understand what type of conversion the original page can generate. You must create a clear conversion (success page) for A before considering creating your B.

  • Second: Your Content. We know that conversions generally have to do with squeeze pages but you can optimize your regular blog posts for generating leads or increasing time on site. And one of the best places to start experiment is changing headlines and adding bullet points. Don’t forget to use Google Analytics to set a new goal and to monitor conversions on your original page before split testing.

  • Third: Be patient. I understand that this can be a little difficult when you don’t have enough traffic but you must be conscious that 50 impressions is not a good amount of views to assume that your page is working or not. A good rule of thumb is to wait for at least 50 conversions. And how long it is going to take will depend on your traffic!

  • Forth: The Power of Colors. This is more important for squeeze pages especially when it comes to the color of the button you are using. Two really common colors being used now are red andgreen and they have a totally different meaning. We could start analyzing traffic lights but there are a lot more involved. Green can represent that idea of “hey, I am ready to go!” and red has this idea of warning, excitement and also passion. What do you think will convert better? Well, you need to test this!

  • Fifth: What about Videos? One great way to check if your content is converting at its full potential is to try to use videos throughout your copy. But remember, you are testing this tactic! And of course, if you are comfortable with videos this can make a big difference on your conversions; it can be huge, but when you are just starting, be careful about it. Even though, I highly recommend you give it a shot.

  • Sixth: Focus on Profitable Conversions First! I mean… it’s always great to keep track of everything but you also have to prioritize what will pay your bills first. Your order of priorities should be sales first then leads, then page-views, time on site, bounce rate and so on. There is a saying a learned right in the beginning of my internet marketing enterprise, it’s that you have to focus on what will bring you money the fastest!

  • Seventh: If you can, Use Social Proof. That is so powerful, but I know it can be a problem when you are just starting out and when I read that at the first time I thought …”Well, that is great, it seems to work, but how can I get some testimonials?” I said testimonials because they are the most powerful way to use social proof but even some tweets and likes can make a big difference when it comes to increasing conversions.

  • Eighth: Borrowing an idea. When you are browsing some websites and you land on a really cool squeeze page, just start analyzing it and see if there is a way to adapt what that company is doing to get similar results. Just be careful with the kind of companies you are trying to model. If you are not sure whether their offer is converting or not, it’s better not considering that model. Just be thoughtful! You have to analyze your own emotions… what you were feeling after reading that page… That is the point.

    Read: 5 Uncommon Ways To Get Fresh Ideas For New Blog Posts

  • Ninth: When Split Testing Be Creative. Once you have defined the conversion rate for your original page it is time to use your imagination and create a variation with big changes. It can sound weird because your original page it’s converting already however if you really want to get the most from your offer, you should also know that small tweaks will have just a small impact on your conversions! With that in mind, you should run an A/B test with major changes when comparing version A with B.

  • Tenth. Show results. Maybe one of the best ways to increase your conversions is when your visitors can sense how they can apply what you are teaching on the e-book or product you are promoting! This is effective because they can envision results in advance and when that happens you job of converting them it’s a lot easier.
  • How to Optimize Blog For Google and Other Search Engines

    Being a blogger you must be aware with the fact that Google changes its policies after a short period of time. It is done to punish the spammers who apply black hat SEO techniques on their blog to rank high in search results. After each update, you can notice a change in website’s page ranking in search results. Blogs that have applied white hat SEO techniques rank higher in search engines. Even these policies changes very frequently but if you go through the policies then you will come to know that some of the policies are always same. They have never changed. So, in today post we’ll discuss about Universal SEO Tips for Google that every blogger must know. This will be a beginner’s guide so that you can learn every aspect of white hat SEO from starting.


    Optimizing Blog for Search Engines

    Below I am going to mention those tips which are always same and work to improve blog rankings. There are lot of things that you need to learn but first start with these basic tips because even they are basic but most effective too. You can’t ignore them if you really want better results of your hard work.

    Publish High Quality Content

    When you write post for your blog, make sure that you publish high quality content. It should be keyword rich with at most 3% of keyword density. Also assure that you only publish original content to your blog. It should not be copied from anywhere otherwise Google will punish you for that and you lose your rankings in search results.

    Target Specific Keyword

    In tip #1, I told to write keyword rich article. Except this you must focus on your keywords. Always focus a single keyword in a post. If you target more than one keyword in single post then it will create a fuss in your article that confuses the search engines. You will be penalized your over SEO or Black Hat SEO.

    Catchy Post Titles

    Your post titles should be catchy and must contain your main keyword. Don’t forget to add unique description to all of your posts. Post titles and description is the only thing appears in search results that force the visitors to click on your link to read the entire story.
    Except this you must work on your blog to optimize post titles. You must check below tutorial to optimize your post titles.

    Optimize Images

    If possible then try to insert an image related to topic of the post. It will not only make your content more presentable and stylish but also help to improve its rankings in search results. But you must care about image optimization techniques for better SEO of your posts. I have published a detailed article on this topic. You must check it out for complete information.


    Link to Old Posts

    When you write new post for your blog, make sure to add some links of your old posts in it. The links you add must be related to the current topic that can provide depth information about that topic. Those links will attract the readers to check those posts too. By doing so you will be able to increase your blog page views and you will get more traffic to your blog. If you are getting too much bounce rate on your blog then you must use internal linking because it is the best way to reduce blog bounce rate.

    Update Frequently

    If you just started your blog, then make it your habit to update your blog very frequently in its early stages. Always try to publish at least 2-3 articles daily because regular updated blogs are much loved by Google. Your posts will appear higher in search results and your page rank will increase.

    Add a Sitemap
    When you are ready with your blog and its content, submit your blog sitemap to Google Webmaster Tools. It helps to build better visibility in search results. Adding sitemap also inform the Google for any update you do in your blog.

    How to Add Google Analytics in Blogger

    Once you setup your blog and start publish quality content, its time to track the traffic statistics to know more about the visitors that who are visiting your blog, from where they are, how much time they spend on your blog etc. Google Analytics is the best tool provided by Google to easily track and check real and accurate stats of our blog traffic. Except this you can also check your blog’s bounce rate, unique visitors, page views and visits by adding Google Analytics to your blog. Tracking the traffic statistics of blog is very important if you want to know that what’s going on your blog and the behavior of your visitors. Now you are aware with the benefits of installing GA in blog so let’s see how to install it.

    Create Google Analytics Account

    Before adding GA tracking code to your blog you need a GA account. Follow below steps:
    1. Go to Google Analytics.
    2. Now sign in with your Google or Gmail account.
    3. Click on “Sign Up” button on the next page.
    4.Once you click the sign up button you will redirect to next page there you have to fill a simple form by entering your Blog Title, URL, your Country, Blog Category and Account name. You can enter your blog title as your account name or can choose anything else which helps you to recognize your blog. See below screenshot for complete process.
    5.Once you fill all the details click on “Get Tracking ID” button.
    6.Now click on “I Accept” on “GOOGLE ANALYTICS TERMS OF SERVICE” pop up page.
    7.If everything is fine then you will get a Tracking ID like “UA-39654221-1″ at the top left corner and a Tracking code in a box. Now let’s go to the next step.

    Add Google Analytics to Blogger

    To add GA in your blog you have to perform 2 steps. First you have to add your Tracking ID in blogger settings and then put the tracking code in your template.
    Adding Google Analytic ID to Blogger
    1. Go to Blogger >> Settings >> Other
    2. Now under the “Analytics Web Property ID” enter your Tracking ID in the text field.
    3. Tracking ID
    4. Click on “Save Settings” button.
    Adding Tracking Code
    1. Go to Blogger >> Template >> Edit HTML
    2. Backup your blog template. (Read this: How to backup template in blogger?)
    3. Now search for
    4. And paste your Tracking Code just above it.
    5. Save the template.
    6. You are done!

    How To Increase Blog Pageviews

    Blogging is not only the game of receiving traffic. We have to target each and every visitor to convert them into readers. Blog page views are also as important as traffic. We have to focus on the strategies that work on increase blog page views. If a visitor land on your blog then your aim should be to present a nifty and well detailed content so that the visitor keen to stay at your blog for longer time toread more content provided by you. It will not only increase your blog traffic but also help your blog to rank well in search engines because visitor’s visit time is also an important ranking factor. Today I come with 5 best tips that really perform well in the case of increase in blog page views.

    Show Related Posts

    Whenever you write new post for your blog, always remember to tag it with a keyword rich label before publishing it. Then use related posts widget to show similar posts under that label below every post. It will not only increase your blog page views but also reduce your blog bounce rate.

    Highlight Popular Posts
    Put popular posts widget into blog sidebar to show most trendy posts of your blog. By doing so, you provide one more option to the visitors to click the link. Once they attract towards the popular posts they will surely keen to read them. Hence more blog page views that automatically increase your blog traffic.

    Deep Linking
    You may already know the benefits of internal linking and deep linking is same as internal linking but it has some more benefits then it. Suppose you have two posts in your blog Post A and Post B then you can interlink Post A with Post B. But in case of deep linking you need to link Post A with that post which is same with that topic means which covers topic of Post A in depth.

    Split Lengthy Posts

    Generating quality content for blog is must for success. You should make a plan to publish at least a post with details and well explanation in a week. For ex: 20 Tips to Increase Blog Traffic. Once you write a lengthy and detailed post, the tricky part comes in action. You should be tricky to publish that post. Always split these types of posts into parts like:
    20 Tips to Increase Blog Traffic – Part 1
    20 Tips to Increase Blog Traffic – Part 2
    You can divide 20 tips into two posts means 10 tips for each post. Always publish lengthy content into pieces and link them to each other. By doing so, you will get below benefits:
    1. Increase number of published posts in your blog.
    2. Increase blog page views.
    3. Increase traffic to your blog with the help of each part.
    4. Reduce blog bounce rate.
    5. Chances to get all parts rank with targeted keyword. Hence you achieve search engine domination that increases your blog CTR.

    Use Search Box

    If your readers finish reading the article and want more relevant information and don’t get it then surely they will go back to another blog for more information. To resolve this issue always add a search box in your blog like Google Custom Search Box. This is the best widget that shows more relevant posts than other search boxes.

    Show Post Title Before Blog Title in Blogger

    Post titles and blog title plays a vital role for better ranking in search results. This is the first thing which is checked by visitors to either they should click on this link or not. That means your traffic depends on this thing. Keyword rich titles can bring you more traffic and increase your blog page views. Google shows only first 66 characters of the title in search results. That’s why we should use them effectively. By default, in blogger, our blog title shows before post title. This reduces the SEO benefits because our post titles which have the main keywords got chopped because of the characters limit in search results. So, to take the proper benefits we have to optimize our blog so that post titles shows before blog title in search results.


    Show Post Title First in Search Results

    1. Go to Blogger >> Template >> Edit HTML.
    2. Backup your blog template.
    3. Now search below code in your template.
    4. Replace that code with the below one.


    5. You are done!
    Now wait for the update in search results. Once search results got updated you will see the changes.

    6 Tips To Optimize Images For SEO To Increase Blog Traffic

    We all know that we should optimize our blog posts to rank well in search engine that help us to increase our blog traffic but today I will tell you how to use images for better search engine visibility. Every blogger either using blogger platform or wordpress platform, they must optimize their images while using them into their blog posts before publishing the post. Image optimization really works to improve blog traffic. Lots of webmasters search images from Google Image Search to use them into their blog posts. So, if you have well optimized images into your blog post then it will give you two benefits. One is bring traffic from image search and second is it help web crawlers to better understand your post topic hence higher SERP (Search Engine Result Position). Let’s go to the tutorial to learn some helpful tips about image optimization for SEO.

    Image Optimization Tips

    Below are some very important tips to optimize images before uploading them into blog posts. These tips will improve your blog SEO

    Use Keywords in Image Name

    Have you download an image from internet or click them from your camera to use them into your blog posts? Yes! Wait buddy don’t use them directly into your blog. First change their name into a keyword rich image name. By default image name look like this image1432.jpg or photo123.jpg. Always rename them with your post keyword. For example if I use any image for this post then I’ll rename my image like this image-optimization.jpg.

    Hyphen in Image Name

    Remember when naming your images with your keywords neither use blank space nor underscore ( _ ) between them. Always use hyphen to separate the keywords like I have done in the first example. Because when your use blank space it will automatically convert to ‘%20‘ which have no meaning. In result web crawlers found difficulty to understand the image. Hyphen is always a better option for optimizing the image.

    Use Best Format

    There are lot of formats of images like JPG, PNG, GIF and others. But always use that image format which suits better for web. JPG image format is the most preferable image format by the webmasters because it uses less size memory as compare to other formats. Less image size will help you to reduce blog load time and hence better search engine ranking means more traffic.

    Compress Images

    Before uploading the images into your blog post, first remember that you have compressed them. Compressing the image also help to make your blog loading speed faster and reduce blog bounce rate. You can compress your images in Photoshop. To compress your image in Photoshop go to file menuand click on save for web. It will reduce image size by maintaining the image quality.
    Also you can use online tools to compress your image files. One of the best tool is Yahoo Smush it. Go for it and compress your images for free.

    How to Use Images in Blog Post for Better Search Engine Visibility?

    Now you have optimized your images. It’s time to use them into your blog posts. Below are some advance tips that also come under image optimization in SEO. Read them carefully and follow the instructions.

    Proper Dimension

    When you upload your images into blog post, always give them proper dimensions. Mentioning the dimensions help in faster page loading. Web crawlers don’t get confuse to assume its width and height. If you already give dimensions to your image, then it will be easier for web crawlers to better crawl your content. Use below format to give dimensions to your image.
    width=”320″ height=”210″ src=”URL of image”/>
    Change above highlighted values according to your need.

    Title Tag and Alt Tag

    Title tag and Alt tag works as a description for your images. Web crawlers can’t read images. They only understand them by their name, title tag and Alt tag. Always choose your best keyword to give title and alt tag for your image. To use these tags see the below example.
    title=”Keyword” alt=”Keyword”/>
    Note: Don’t add too many keywords in these tags. Only put your best keyword there which better explain your post topic

    Add Automatic Read More With Thumbnail To Blogger

    Almost every blogger or webmaster uses Automatic read more with thumbnail feature in their blog because it add more functionality and give a professional look to the blog. Beside this it has many advantages like it shows only post summary (excerpt or snippet) with thumbnail on the blog homepage, labels and archive page that increase your blog page views, it help to reduce blog load time of your blog by reducing the long lengthy posts into a short summary with first image of the post at homepage. It also help to reduce bounce rate of blogger blog because if reader is interesting to read the full post then he/she have to click on read more link hence less bounce rate. As you know now the benefits of adding read more link into blogger, let see how to add it with very simple steps.

    Add Auto Read More To Blogger

    1. Go to your Blogger Dashboard > Template.
    2. Backup blog template to prevent the template by any crash during making changes to add read more.
    3. Click Edit HTML > Proceed.
    4. Check Expand Widget Template checkbox.
    5. Press Ctrl+F and find the below code in your template.
    6. and paste the below code just above / before it.

    7. Now search and replace it with the below code.


    8. Read More


    9. Now preview your template and save.
    Customization: Below are some customization tips that you can do in the first code to achieve the following results.
    1. showImage: true, This code will show summary with thumbnail. If you don’t want to show thumbnail then change true to false.
    2. imgFloat: ‘left’, To change image location replace left with right.
    3. imgWidth: 120, imgHeight: 90, Default width and height of the thumbnail. Change these values according to your need.
    4. defaultThumb: ‘https://blogger.googleusercontent.com/img/b/R29vZ2xl/AVvXsEjslPtVVASybRg1oiad0-Awcg9T7vH02W3Gzgcz6X-mLwNZ4zQpj0ItB2KHjd1nqGWXONOeekvmWV7h0x4lNydJ9ouWzSykv0nACn2I3JSR4ADQHbtNmaXdqHjNyxMVNj6jBx9HePHxos4/s1600/no-thumb.jpg’, If there will no any image in the post then the default image will be show as a thumbnail. You can change it by replacing it with your own image url.
    5. words: 65, No of words shown along with thumbnail.
    6. wordsNoImg: 80, No of words without thumbnail.
    7. skip: 0, If you not want to show read more on some starting posts then change 0 with no. of posts. For example if you change 0 with 2, then read more function will not work for first 2 posts.
    8. showHome:true,Change true to false if you don’t want to show read more on Homepage.
    9. showLabel:true,Change true to false if you don’t want to show read more on Label Page.

    Output

    Once you save your template, visit your blog. The read more link with thumbnail will look like this:
    auto read more

    4 Benefits of Internal Linking in SEO

    Last but not the least benefit of internal linking is it decrease your blog bounce rate without doing any extra hard work. You just provide links to more relevant posts and readers click those links to read more content. It automatically increase blog page views and reduce bounce rate that is must for every blog to build trust in the eyes of search engines. less bounce rate shows the authority and usability of a blog.

    7 Basic On Page SEO Tips For Blogspot Blogs

    Search Engine Optimization (SEO) is the most important thing to learn for best blogging experience. Without proper blog optimization, we can’t even dream to get impressive traffic from search engines. From past few days, I am getting too much request of newbie bloggers to share some On-Page SEO Tips. That’s why today I plan to mention all those On Page SEO tips which I already shared on my blog in my earlier posts. I’m sorry if you have read those posts before, but I need to grab attention of newbie bloggers who just start learning SEO for their blog. All those tips are must to know by every blogger. So, let’s take a look on best On-page SEO Tips for Blogspot Blogs and if you have read them before then don’t ignore this post. May be you learnt something new which you ignore before because of any reason.
    On Page SEO Tips

    On Page Search Engine Optimization Tips For Blogspot

    Below are the tips and tricks that will be beneficial for you to optimize your blog for Google and other search engines.

    Custom Robots Header Tags

    There are some settings for bloggers that they can personally do for their blogs to make their blogs for SEO friendly. Custom Robots Header Tags setting in one of them. It’ll be beneficial for you to use custom robots headers tags correctly. It’s easy to manage these settings. Just take a look at below tutorial

    Custom Robots.txt

    Search engine bots like Googlebot (Web Crawling Robot of Google) needs some guidelines on how they have to crawl and index our blog. We can prevent some non important pages labels pages from indexing in Google to protect our blog from duplicate content issues. Got confused? Check out below tutorial which will clear all of your confusions.

    Optimize Blog Post Titles

    If you just started your blog on blogger’s default template, then definitely you’ll not be aware with this fact that your post titles are not properly optimized for search engines. You need to do some editing in your blog template to make your post titles properly optimized. You will see a noticeable change in organic traffic of your blog after making this change. Follow the instructions given in below mentioned post.

    Image Optimization

    You may definitely notice relevant images between the posts on many blogs. Images not only enhance the look of our content, but it also plays an important role to optimize our blog posts. If we make effective use of images in our blog posts, then we can attain extra traffic from search engines. Follow below post to learn more on image optimization in blogger.

    Internal Linking SEO

    Many bloggers fail to optimize their internal links or even they don’t link their posts to each other internally. This is really a big mistake that we must avoid. Internal linking not only increases our blog page views but also help our posts to rank well in search engines. If you are also doing the same mistake, then you must need some tips to optimize your internal links.


    Search Engine Submission

    When we are ready with our blog optimization, then we need to submit our blog in Google’s webmaster tool. Verifying and submitting our blog in Google webmaster tool helps it to get indexed in Google super fast. It also tells about our blog issues like broken links, HTML improvements etc that we must try to resolve. We just need to verify our blog ownership and submit a sitemap. That’s it. If you have not added your blog GWT, then I recommend you to read below tutorial.

    Improve Your Blog Load Time

    If your blog takes lot of time, then visitors will go back and never come back again. It will increasebounce rate of your blog and you’ll lose your valuable traffic. Search engines give more value to fast loading blogs because they want to build best user experience. That’s why it’s very important to optimize blog loading time. I have shared some best tips that can help you to enhance your blog’s loading speed.

    How To Add Keywords in Blogger Posts

    If you have original and SEO friendly content in your blog, then no doubt you can surely get high ranking in search results. Writing SEO friendly blog posts is not much tough as beginners think. We just need to focus on some places where we can add keywords in our blog posts to make them optimized for search engines. Don’t forget, optimizing blog posts for search engines is not mean to compromise with content quality. We have to add keywords in a proper way so that it looks natural for our readers and for search engines too. I’ll outline 6 best locations to add keywords in blogger blog posts. Hope you would like to know them.


    Optimize Blog Posts By Adding Keywords Smartly

    Before I cover today’s topic, you must need to know that adding too much keywords in blog posts is not good for our blog health. We should keep it’s density below 3% for better optimization of our blog posts.
    The locations I’m going to tell you to add keywords are the safest and best locations of our blog area. If you want to get your blog posts rank high in search results, then don’t miss to target below locations:

    1# Starting and Ending Para of Content

    Whenever you write new post for your blog, always remember to add your main keyword in first and last paragraph of your content’s. Both the locations are best for this purpose and search engines also look for keywords in these two places to decide the ranking of our blog posts.
    We can add more targeted words in the form of phrases between the content to make it more SEO friendly.
    Note: Don’t use same words again and again. Better to use multiple and relevant words. Using multiple related word not only protect our content from keyword stuffing penalty but also help it to appear high with multiple search terms.

    2# Image Name, Alt Tag and Title Tag

    We all know that images plays best role in explanation of the topic. But using images we can also optimize our blog posts even better.
    We just need to optimize our images before inserting them into our posts. The better we optimize the images, the better our posts will optimize for search engines. Read below mentioned post to know best 6 ways to optimize images.
    If we talk about adding targeted words in blog posts using images, then let me tell you that image’s name, title tag and alt tag are the best and prominent places.

      3# Title Of Our Posts

      Our post titles are the top most places to add our targeted keywords. You may listen that we should use catchy post titles to attract more readers. But with catchy post titles we should also remember to add our keywords there.
      Meaningful post titles grab more audience. Not only from social sharing sites, but from search engines too.
      So, always try to use meaningful and catchy post titles to boost your posts traffic.

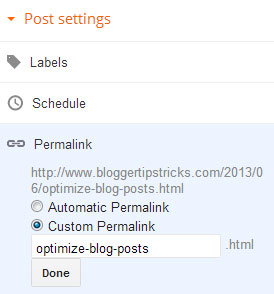
      4# Permalink of Posts

      Permalink is the URL of our blog posts. It’s a killer location to add really targeted keywords.
      By default, permalinks create on the basis of our post’s titles. But we can use our custom permalinks to add our keywords.
      To add custom permalinks go to your Post Editor > click on Permalink from the right side menu and choose Custom Permalink. Add your main keywords there and press Done button.
      optimize blog posts
      Note: Always try to use only targeted keywords in permalinks. Other non important words should be ignored.

      5# Post Labels

      Post labels not only used to categorize our blog posts. If used smartly then we can take their benefits to optimize our blog posts too.
      Stop using non keyword rich names for your labels. Named them correctly and put your really targeted words there.
      If you had forgetten to insert your keywords in label’s name, then don’t worry. We can rename them too.

      6# Post Comments
      Many bloggers are unaware with this trick that we can use our blog comments too to add some keywords in our blog posts.
      Yes, you heard it right. There are lot of benefits of blog comments and if we use them effectively then no doubt we can get higher ranking in search results.
      Whenever you reply your reader’s comment on your blog, try to add some keyword phrases in your reply in a natural way that looks obvious while reading.
      Note: Instead of adding your focused words try to use some long tail keywords in your comment section. In that way you can improve your keywords ranking

      How to change blogger background color

      Now follow simple steps below and change your blog's background color or image:


      • Go to Blogger >> Template >> HTML >> Proceed
      • Search for body and you'll find something similar code like below image
      blogger background image
      In above image you can clearly see that an image has been used as a background in the body selector. The body selector is a default selector in CSS responsible for the entire document. Now you can delete the existing image and add your own image for background. However, if you want to remove the picture and want to add simple colors then remove the all image address including the parentheses like this: ("http://were...wrerwer.e..ewr.wer.we..r.jpg"), delete the whole thing and replace it with a color name like red, blue, brown, green etc visit this page for color codes and names: click here

      Also check below screen shoot for another example of finding BODY selector in your blog's template and its properties:
      blogger background color
      In above image instead of background image a simple color has been used and you can easily change it with whatsoever color you want. Just visit a given link in previous paragraph and find a huge number of color codes and names. In above screen shoot the #104E8B is a color code and you'll just have to replace that with your desired color. After changing the code with yours must save the template and view your blog for seeing the changes.

      Custom Robots Header Tags Settings in Blogger

      Setup Custom Robots Header Tags

      First enable this option from your blogger settings and then I’ll tell you how to use it.
      1. Log in to your blogger account.
      2. Now navigate to Setting >> Search Preferences
      3. search preferences
      4. Click on edit link under the Custom Robots Header Tags section as shown in below screenshot.
      5. custom robots tags
      6. Once you click on the edit link you will see many options. Simply tick on the options as shown in the below image.
      7. Setup Custom Robots Header Tags
      8. Now click on “”Save changes” button.
      9. You are done!